If you are aware of the most used JavaScript frameworks nowadays, surely you have heard about Vue.js. If not, next I’ll describe it for you quickly.

What is Vue?
Vue is a progressive framework for building user interfaces. And it is basically focused in the view layer only. It has a very low learning curve, it is easy to integrate with other frameworks and libraries and it is very easy to adopt in any project.
Tutorial of initiation
In this small tutorial, we’ll create a small todo list app, with the possibilities of creating, finishing and deleting tasks. To achieve this, we are going to use some of the most important Vue directives and we will also cover how to add interactivity through events.
For this tutorial I’ll use the Bootstrap CSS classes to speed up the process and focusing in the most important thing: learn how to work with Vue
HTML layout
The starting point is to create an HTML file with the Bootstrap styles and the Vue framework:
<!DOCTYPE html>
<html>
<head>
<title>Vue.js tutorial</title>
<meta charset="utf-8">
<link rel="stylesheet" href="https://stackpath.bootstrapcdn.com/bootstrap/4.1.0/css/bootstrap.min.css" integrity="sha384-9gVQ4dYFwwWSjIDZnLEWnxCjeSWFphJiwGPXr1jddIhOegiu1FwO5qRGvFXOdJZ4" crossorigin="anonymous">
</head>
<body>
<script src="https://cdn.jsdelivr.net/npm/vue@2.6.14"></script>
</body>
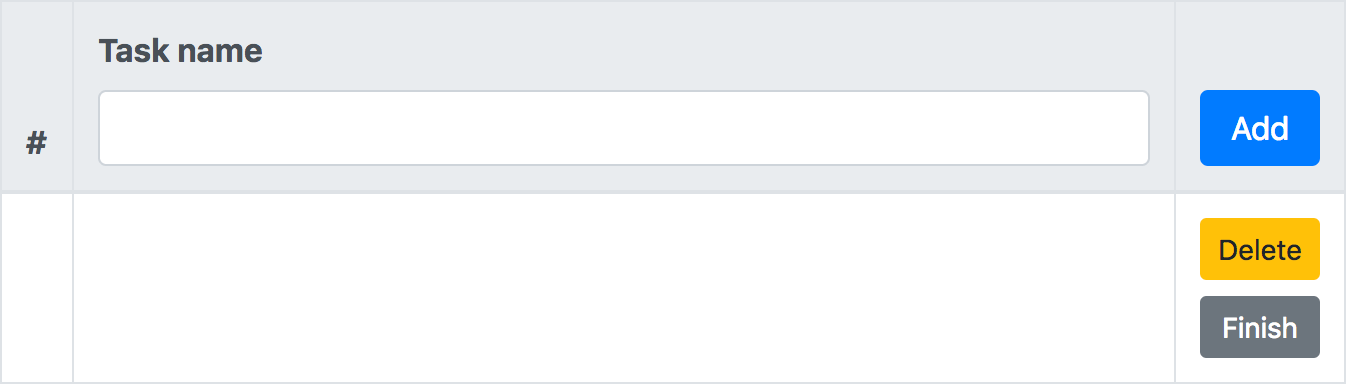
</html>Inside the body tag, let’s create a Bootstrap table with the next structure:
<body>
    <table id="list" class="table table-bordered">
        <thead class="thead-light">
            <tr>
                <th scope="col" width="5%">#</th>
                <th scope="col" width="85%">
                    <label for="task-name">Task name</label>
                    <input
                        type="text"
                        class="form-control"
                        id="task-name"
                    >
                </th>
                <th scope="col" width="10%">
                    <button
                        type="button"
                        class="btn btn-primary btn-block"
                    >
                        Add
                    </button>
                </th>
            </tr>
        </thead>
        <tbody>
            <tr>
                <th scope="row"></th>
                <td></td>
                <td>
                    <button
                        type="button"
                        class="btn btn-sm btn-warning btn-block"
                    >
                        Delete
                    </button>
                    <button
                        type="button"
                        class="btn btn-sm btn-secondary btn-block"
                    >
                        Finish
                    </button>
                </td>
            </tr>
        </tbody>
    </table>
    <script src="https://cdn.jsdelivr.net/npm/vue@2.6.14"></script>
</body>
This will be the result of the previous code:
Vue instance
Let’s create the Vue instance needed by the app. I’ll place it in a separated JavaScript file (vue-list.js) included from the HTML:
const app = new Vue({
    el: "#list",
    data: {},
    methods: {}
});
The names of the parameters are very descriptive. The el parameter is to set the instance’s root reference, in this case, it will be the table with the list id. The data parameter is an object containing all the data that it is needed by the instance. And finally, the methods parameter will hold all the methods that will be executed by the instance.
Let’s add to the data an array of objects consisting in the list of tasks. This array will be used later to render the table rows:
const app = new Vue({
    el: "#list",
    data: {
        list: [
            {name: "Go to the school to pick up my notes", finished: true},
            {name: "Bring the dog to the vet", finished: false},
            {name: "Call Martha", finished: false}
        ]
    },
    methods: {}
});
Working with directives
Now, let’s see how can be used this array to render a table row for each object contained in it. To do this, let’s use the v-for directive. This directive is used to create a loop and display an element multiple times.
<tbody>
    <tr v-for="(row, index) in list">
        <th scope="row">{{index + 1}}</th>
        <td>{{item.name}}</td>
        <td>
        ...
        ...
        </td>
    </tr>
</tbody>
As can be seen, we’ve created a loop iterating over the list array. On each iteration, it has been placed the index of the array incremented in one inside the th, and the name property of each object inside the first td element of each row. The result will be the next one:
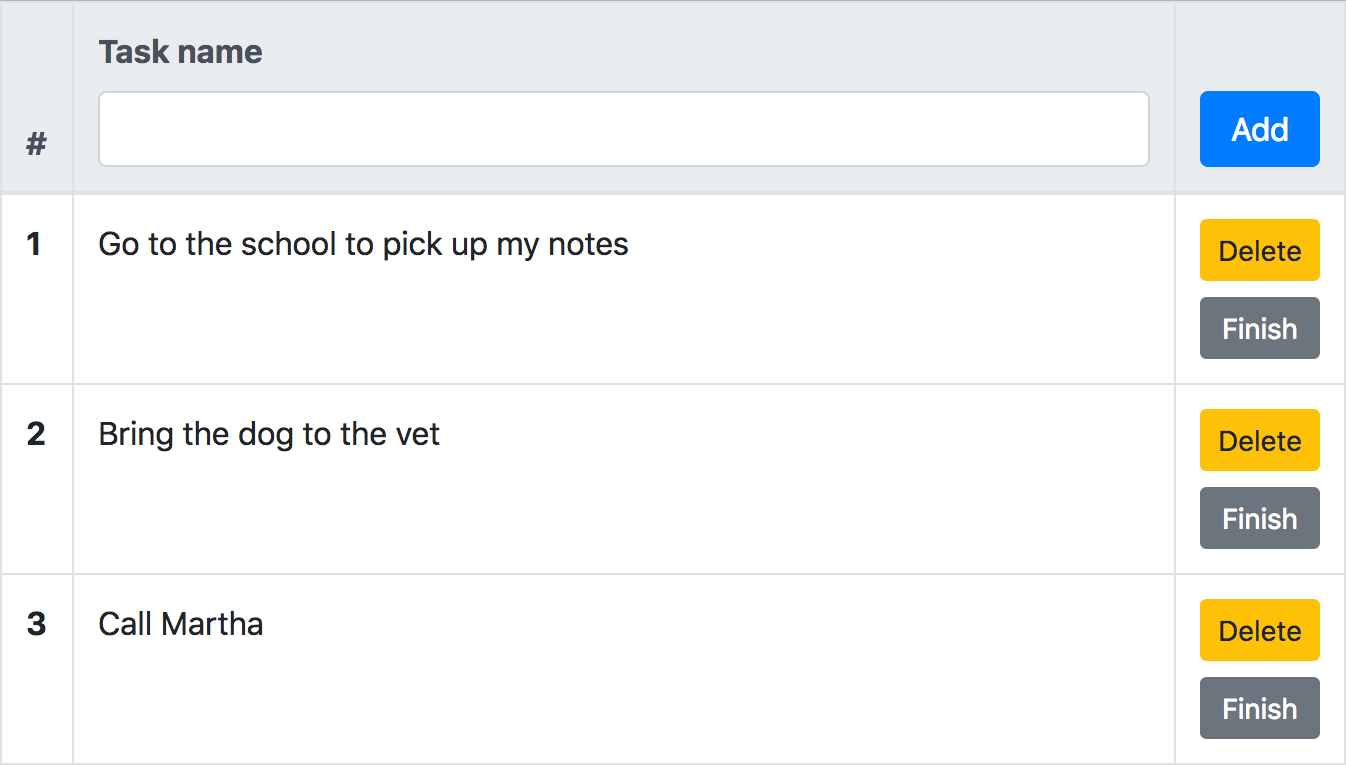
The next step is hiding or showing the Delete and Finish buttons depending on the finished property value of each object in the array. Let’s show the Finish button only when this property is false and the Delete button only when it is true. To achieve this, we will use the v-if and v-else directives. These directives allow us to show or not a DOM element depending on specific condition:
<tbody>
    <tr v-for="(row, index) in list">
        ...
        ...
        </td>
        <td>
            <button
                v-if="row.finished"
                type="button"
                class="btn btn-sm btn-warning btn-block"
            >
                Delete
            </button>
            <button
                v-else
                type="button"
                class="btn btn-sm btn-secondary btn-block"
            >
                Finish
            </button>
        </td>
    </tr>
</tbody>
The result will be the next one:
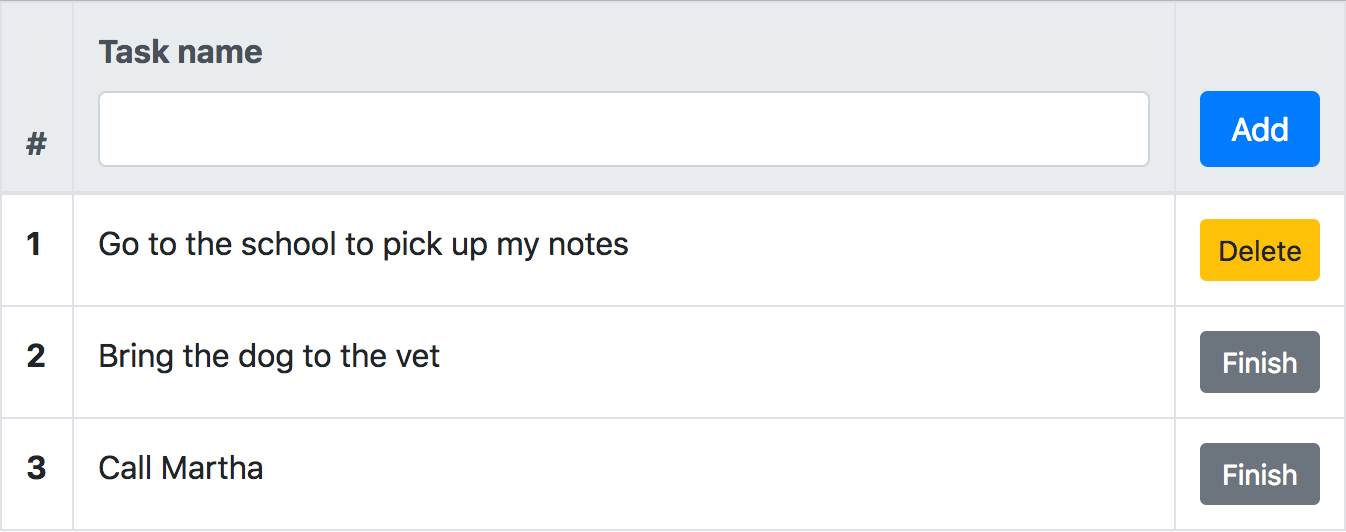
Now, to communicate more clearly that a task is finished, let’s cross out the name of it in these cases. To achieve this, we will use the v-show directive. This directive will switch the display: none CSS property depending on a condition. That is to say, unlike v-if and v-else, the element will remain in the DOM, it is just that it will be visible or not depending on a condition:
<tr v-for="(row, index) in list">
    ...
    ...
    <td>
        <del v-show="row.finished">
            {{row.name}}
        </del>
        <span v-show="!row.finished">
            {{row.name}}
        </span>
    </td>
    <td>
        ...
        ...
    </td>
</tr>
When the finish property of each row gets true, the del element will be shown (if this property is false this element remains hidden). On the other hand, when the property gets false, the span will be shown (if this property is true this element remains hidden). The result will be the next one:

Two-way binding
Now, let’s create a name property inside data with a default value of an empty string:
const app = new Vue({
    el: "#list",
    data: {
        name: "",
        list: [
            {name: "Go to the school to pick up my notes", finished: true},
            {name: "Bring the dog to the vet", finished: false},
            {name: "Call Martha", finished: false}
        ]
    },
    methods: {}
});
Now, let’s bind the value of the input to this property, using for this, the v-model directive. This directive will create a two-way binding between the input and this property. When the input changes, the property will get update and also in the other way around:
<thead class="thead-light">
    <tr>
        <th scope="col" width="5%">#</th>
        <th scope="col" width="85%">
            <label for="task-name>Task name</label>
            <input type="text" class="form-control" id="task-name" v-model="name">
        </th>
        <th scope="col" width="10%">
            ...
            ...
        </th>
    </tr>
</thead>
Adding interactivity
Now, it is possible to add interactivity to the App. To achieve this, we will use the v-on directive. This directive is useful to hear DOM events. In this case we will use its shorthand method.
Let’s start by adding a click event in the Add button, which will call the add method inside the Vue instance methods:
<thead class="thead-light">
    <tr>
        ...
        ...
        <th scope="col" width="10%">
            <button
                type="button"
                @click="add"
                class="btn btn-primary btn-block"
            >
                Add
            </button>
        </th>
    </tr>
</thead>
And in the instance:
methods: {
    add () {
        this.list.push({name: this.name, finish: false});
        this.name = "";
    }
}
When the Add button is clicked, a new object is added into the array. Do notice how the name property that is used by the input as a model is used as the name property of the object. Once the object is pushed into the array, an empty string is assigned again to the name property.
Test the result and you’ll see that it is possible to write a task name and add it to the list clickin on the Add button.
Now, let’s add a click event to the Finish button. This event will just assign a true value to the finished property:
<tbody>
    <tr v-for="(row, index) in list">
        ...
        ...
        <td>
            <button
                v-if="row.finished"
                type="button"
                class="btn btn-sm btn-warning btn-block"
            >
                Delete
            </button>
            <button
                v-else
                type="button"
                class="btn btn-sm btn-secondary btn-block"
                @click="row.finished = true"
            >
                Finish
            </button>
        </td>
    </tr>
</tbody>
Test the result and you’ll see that it is possible to finish a task clicking on the Finish button. Once you click on it, the button will disappear showing in its place the Delete button and the name of the task will get cross out.
And finally, let’s create a click event in the Delete button, which will call the del method inside the instance methods:
<tbody>
    <tr v-for="(row, index) in list">
        ...
        ...
        <td>
            <button
                v-if="row.finished"
                type="button"
                class="btn btn-sm btn-warning btn-block"
                @click="del(index)"
            >
                Delete
            </button>
            <button
                v-else
                type="button"
                class="btn btn-sm btn-secondary btn-block"
                @click="row.finished = true"
            >
                Finish
            </button>
        </td>
    </tr>
</tbody>
And in the instance:
methods: {
    add () {
        ...
    },
    del (index) {
        this.list.splice(index, 1);
    }
}
The del method receives the index of the row in which the button has been clicked, and a splice is applied to the array deleting the element in that index.
Test the final result and you’ll see that now it is possible to add, finish and delete tasks.
Final demo
Download the example files
That’s it all, the todo list app is ready. As you can see, starting to work with Vue is not hard. It is very intuitive and very easy to adopt in a short period. If you want to learn more, you can check the Vue documentation that is pretty well to start.
I hope that this short tutorial has helped you to get started with Vue.js.
Download the example files of the tutorial of initiation of Vue.


 (3 votes, average: 2.33 Out Of 5)
It is possible to insert code fragments between <pre></pre> tags and HTML or XML code between <xmp></xmp> tags.