Live Shapes is a functionality that was necessary in Adobe Illustrator since a long time ago. The possibility of drawing a geometric shape and edit its own properties later on, and not necessarily on the moment in which the shape was created, is something so basic that it is hard to believe that it was not available in a professional software as Adobe Illustrator. Something so basic as crating a rectangle with round corners and later be able to edit the curvature of those corners, was impossible to achieve in Illustrator but nevertheless it was available in the discontinued Freehand.
On version 2014 of Illustrator CC, the possibility of editing the rectangle corners was added, and later on, on version 2015.2 more Live Shapes were added, bringing this feature to any geometric shape built in Illustrator.
In this tutorial, we are going to analyse how to create Live Shapes in Adobe Illustrator and how to edit them later, either from the shape itself than from the Transform panel. In the next section we are going to cover each one of the Live Shapes that we can create.
Line Segment Tool
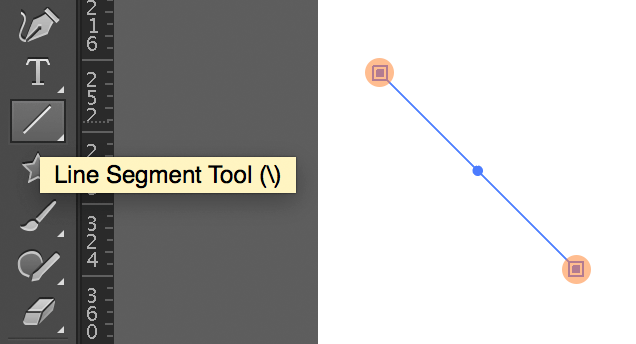
This is the most basic Live Shape that we can find. It is a line segment consisting of just two controllers, ● the initial point and the end point. Without recurring to the Direct Selection Tool, it is possible to change the position of these points with the Selection Tool. Hovering these controllers, the mouse will change indicating that the point could be dragged. Here is a video of this process:
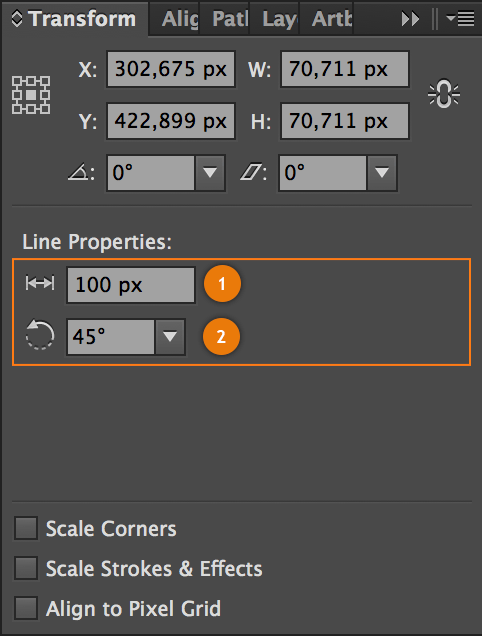
Edit the line segment from the Transform panel
With a segment tool selected, it is possible to modify its properties from the Transform panel.
| Legend | |
|---|---|
| 1 | This controller allows us to change the length of the segment. |
| 2 | This controller allows us to change the segment angle. If we unfold the options of this control, we can find angles from 30º to 330º. |
Here is a video of the process to edit a Line Segment using the Transform panel:
In my opinion, these options lack the possibility of editing the coordinates of the initial and the final point.
Rectangle Tool
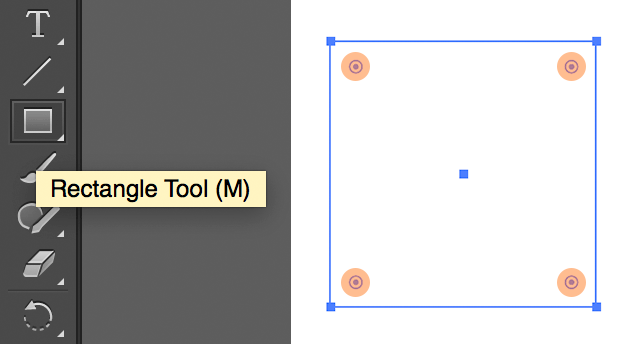
When a rectangle is created, a little controller will appear on each corner. ● These controllers allow us to round the rectangle corners.
Round all the corners at the same time
If the mouse gets close to one of these controllers, it will change to an arrow with a small arc at the bottom. If we drag the controller to the center of the rectangle, the rectangle corners will be rounded. When the maximum value is reached, the border colour of the shape will change to red. Here is a video of this process:
Round each corner individually
If we click on one of the controllers, we are going to select ir. In this case, the mouse will change to the same arrow with a small arc below, but in this case, the arc will have a point in the centre. After selected, if we drag the controller to the centre of the rectangle, we are going to round that corner individually. In this way, we can round each corner individually, giving different round values to each one of them. If we want to select more than one corner at the same time, we can do it pressing SHIFT while clicking on the controllers. Here is a video of this process:
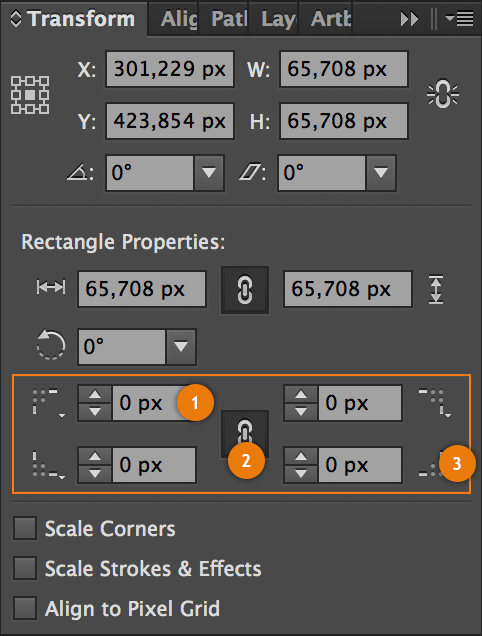
Round the corners on the Transform panel
If we want to have more control over the rectangle corners or edit their values in a more exact way, we can achieve it through the Transform panel. In Rectangle Properties we can find a new section to modify each one of the corners.
| Legend | |
|---|---|
| 1 | In these controllers we can change the transformation value of each corner, either writing a value with the desired number or clicking on the up and down arrows to increase or decrease the value one by one. |
| 2 | Clicking on this icon we can choose between modifying all the corners at the same time and modifying each corner separately. |
| 3 | With these buttons we can change the Corner Type of each corner. Besides the Round corner, which is the default one, we can choose also Inverted Round or Chamfer. |
Here is a video of this edition process using the Transform Panel:
Ellipse Tool

With an ellipse, we will have two kinds of controllers. If we look at the previous image, ● one kind of control will be found on the border of each ellipse side and it allows us to change the scale of it proportionally. ● The other kind of controller is located on the exterior border of the ellipse and it allows us to change its internal angle to conform a pie (something that was also available on Freehand). Once the internal angle is changed, we will have two controllers of this kind, one for the beginning of the angle and another one for the end of the angle. Here is a video showing the process of the edition of the ellipse parameters:
Change ellipse properties using the Transform Panel
Ellipse‘s parameters can also be changed from the Transform Panel, having the ellipse selected, if we open the panel we can find these options.
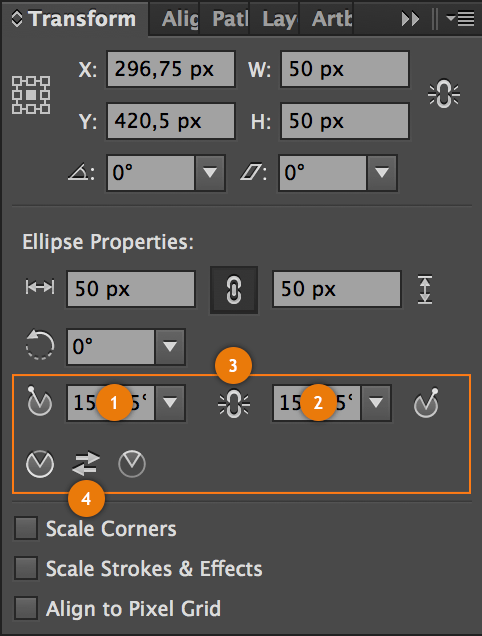
| Leyenda | |
|---|---|
| 1 | Defines the Pie Start Angle. If we unfold this select we will find angles from 30º to 330º. |
| 2 | Defines the Pie End Angle. If we unfold this select we will find angles from 30º to 330º. |
| 3 | With this controler we can block the difference between the start and the end angles. If we change one of them the other will be affected accordingly. |
| 4 | Pressing the icon with the arrows placed between the two pies, we can invert the graphic. With this, we replace the start angle by the final one. |
The next video is the process of edit an ellipse using the Transform Panel.
Polygon Tool
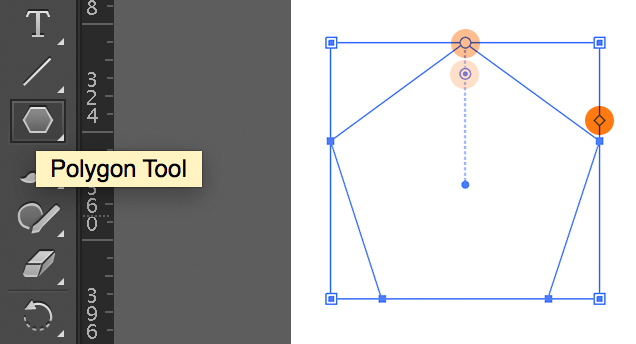
With a polygon shape we will have three kinds of controllers. If we check the previous image, ● the first controller will be located in the top-inner corner and it will allow us to round the polygon corners. ● Another controller is located just in the top corner of the polygon and it will allow us to change its scalle proportionally. ● And the last controller, with a rhombus shape, will be placed in one side of the polygon; this controller will allow us to change the number of faces of the polygon from 3 to 10. The next video shows the process of editing these parameters in a polygon:
Changing the polygon properties using the Transform Panel
Polygon‘s parameters could be also changed from the Transform Panel. Having the polygon selected, if we open this panel, we can find the next options:
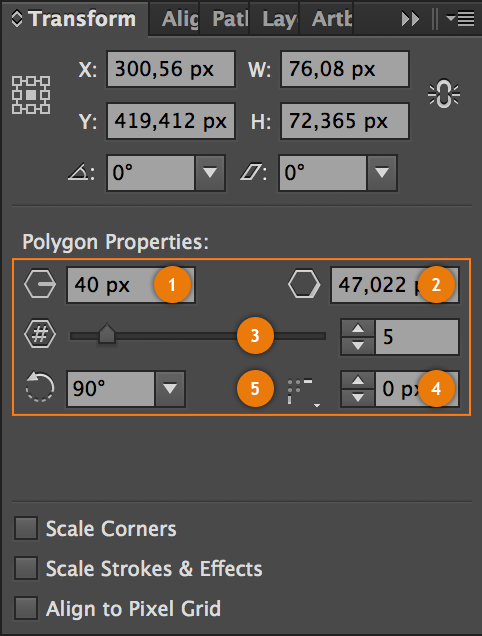
| Leyenda | |
|---|---|
| 1 | With this controller we can change the polygon‘s radius and make it smaller or bigger proportionally. |
| 2 | This controller defines the length of each polygon‘s face. If If you change the polygon‘s radius, this value will be affected and vice versa. |
| 3 | With this slider it is possible to change the number of faces of the polygon. We can assign up to a maximum of 20 faces. The controller to the right of this slider allows us to the same entering the values. |
| 4 | This controller defines the transformation value of each corner. |
| 5 | With this selector we can change the vertex shape of each corner. On top of the round vertex that we have by default, we can also choose inverted round or chamfer vertexs. |
The next video shows the process of editing a polygon using the Transform Panel:
And that‘s it. I hope this tutorial about Live Shapes in Adobe Illustrator has been of help to you.

 (4 votes, average: 3.00 Out Of 5)
It is possible to insert code fragments between <pre></pre> tags and HTML or XML code between <xmp></xmp> tags.